| • | What is the general process of adding ordered items the catalog? |
| • | How do I load only the received items for an orderline? |
| • | How do I load an order if I only know the PO number, not the exact title? |
| • | How do I load only specified holdings? |
| • | How do I load multi-part orderlines? |
| • | Can I print item labels as I add items to the catalog? |
For additional information, see FAQs: Processing/Closing Received Orders.
What is the general process of adding ordered items the catalog?
Only orderline items that have holding distributions can be loaded into the catalog. At any time after the order-title link has been created, you may choose to load the holdings from the order record into the catalog. The Add Ordered Items to Catalog wizard is designed for use by the cataloger who classifies the ordered material.

Before loading order holdings, be sure the order is linked to the correct title.
To add items to the catalog
| 1 | A single title in the catalog may be linked to several different orders. Once you click the Add Ordered Items to Catalog wizard, a list of orders appears. |
| 2 | Select the order to be loaded and click Load Ordered Copies. |
| 3 | Modify the Base Call Number, if needed. This is the most efficient place for a cataloger to specify the call number for these items. All call number records created for various libraries or for parts in a set will share this base call number. |
Important: If they exist, do not modify any analytics within this field.
If you modify the Base Call Number field, the Class Scheme field becomes active. Modify the class scheme for the base call number, if needed.
| 4 | Under Distributions, the Holding Code that will be used for the new items appears for each distribution. Use the to select a different holding code. |
| 5 | For each distribution, select the Add Item check box to create items for the distribution. The Add Item check box is selected automatically if the distribution has been received. If a particular distribution should not be loaded, clear the check box. |
| 6 | If the orderline distributions were previously received, the Date Received appears, otherwise the date received defaults to NEVER. If the Allow Receiving behavior was selected in wizard properties and you select the Add Item check box, you can set the actual Date Received using the Calendar Gadget, or you can type TODAY or NEVER. |
| 7 | Click Add/Update Items to display a list of loaded items as well as the unloaded distributions. Call number and item information appears for the loaded item(s). An auto-generated item ID appears in the New Item ID field(s). If an item is to be barcoded, scan or type the item ID. |
| 8 | Click Add/Update Items to complete the load. |
The call number/items are created in the catalog just as if you had added them with other cataloging wizards. Once all ordered items have been added to the catalog, the catalog record no longer displays the ON ORDER message in the e-Library.
An item created with the Add Ordered Items to Catalog wizard always contains a link to the order line distribution record that created it. This information appears when all orders are displayed on the Orders tab of the Item Search and Display wizard, which displays the order ID, fiscal cycle, and orderline used to load items. When displaying or modifying the order, the Loaded date will appear for all loaded distributions.
How do I load only the received items for an orderline?
After you identify a title, the Add Ordered Items to Catalog wizard displays all holding distributions for the orderline linked to the specified title that have not already been loaded. Open distributions display an actual Date Received or TODAY value, but not NEVER.
Follow the preceding add ordered items to catalog process. The Add Item check box will be selected automatically for open distributions that are already received.
How do I load an order if I only know the PO number, not the exact title?
To identify the order you want to load, first use Display Order wizard.
| 1 | Click the Display Order wizard. |
| 2 | Select the Order ID index from the list. |
| 3 | Type the Order ID or PO number in the Search For field, and click Search. |
| 4 | Select the orderline you want to load, and click the Display Orderline helper. |
| 5 | Close the helper, and click the Add Ordered Items to the Catalog wizard. |
| 6 | The orderline you selected will appear as the Current item. Click the Current item. |
| 7 | Review the purchase order, orderline, and title information to confirm that the received order is the correct one. |
| 8 | Make any modifications required to the Base Call Number, Class Scheme, Holding Code, or Date Received. |
| 9 | Select the Add Item check boxes next to the distributions for which you want items created. |
| 10 | Click Add/Update Items to display call number and item information for the item(s) to be created. If the item is to be barcoded, scan the item ID and click Add/Update Items to complete the load. |
How do I load only specified holdings?
After a title is identified, the Add Ordered Items to Catalog wizard displays all holding distributions for the orderline linked to the specified title that have not already been loaded.
To load only specified holding distributions
| 1 | In the Base Call Number field, type a call number for the items being received, if it is different from the default call number. |
If needed, select the Class Scheme for the base call number.
| 2 | Under Distributions, review the holdings distributions. Select the Add Item check box for each distribution you want to load. Clear the Add Item check boxes for holding distributions you don’t want to load. |
Note: By default, the Add Item check boxes of received distributions are selected, and unreceived distributions are cleared.
| 3 | Click Add/Update Items, and the wizard displays an “Item created” message. |
| 4 | Under each loaded distribution, the library and copy number appear. You can modify the Call Number and New Item ID values. The insertion point is in the first New Item ID field, ready to be updated with an actual, scanned barcode, if desired. |
| 5 | After making modifications, click Add/Update Items. |
The next time you use the Add Ordered Items to Catalog wizard for this title and orderline, only the distributions that have not yet been loaded will appear for selection.
How do I load multi-part orderlines?
The process of loading orders that have multiple parts/volumes does not differ substantially from adding holdings for single or multi-copy order lines. In the case of multi-part orderlines, however, the Parts field appears for every holding distribution. Almost every volume specified in the formatted list of parts, will, if loaded, create a new call number. The exception is the first volume in the list—the volume name will be added to the call number linked to the orderline as long as a copy is not already associated with that call number.
It is critical at this point that the Parts, Received, and Unreceived volumes in the set are typed according to the syntax in FAQs: Typing Orderline Parts.
After a title is identified, the Link Order Line Holdings to Titles wizard displays all holding distributions for the orderline linked to the specified title that have not already been loaded.
To load multi-part holdings distributions
| 1 | In the New Call Number field, type a call number for the items to be received, if it is different from the default call number. |
| 2 | If desired, select a class scheme in the Class Scheme field. |
| 3 | Under Distributions, review the holdings distributions. Select the Add Item check box for each distribution for which you have received volumes to load into the catalog. |
Note: If only a partial set is received, you cannot receive the order using this wizard. Use the Receive Orders wizard so that unreceived volumes may be loaded separately and claimed.
| 4 | Clear the Add Item check boxes for volumes you don’t want to load. |
Note: By default, the Add Item check boxes of received distributions are selected, and unreceived distributions are cleared.
| 5 | Click Add/Update Items, and the wizard displays an “Item created” message. |
| 6 | Under each loaded distribution, the library and copy number appear for each of the volumes loaded. The Call Number and Item ID values may be modified. The call number automatically includes the analytic (such as |zV.1) for each of the volumes loaded. The insertion point is in the first Item ID field, ready to be updated with an actual, scanned barcode, if desired. |
You may continue to update fields that can be modified, the click Add/Update Items to complete the load.
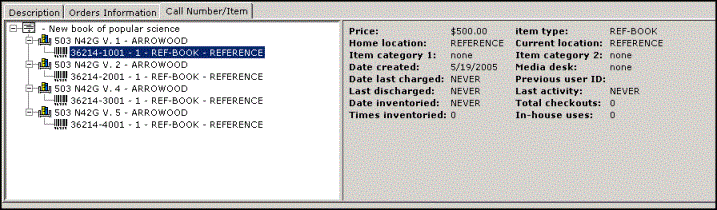
For example, the library ordered a six volume set. Four of the six volumes were received. Volumes three and six were not received. The received order appears like the following.
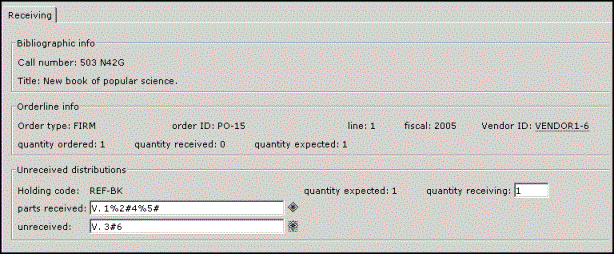
Distributions for the unreceived volumes appear in a separate holding segment in the order.
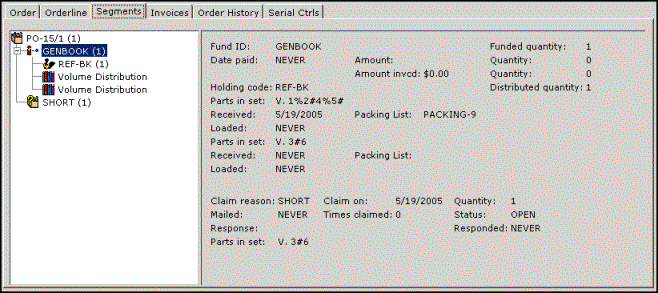
When using the Link Order Line Holdings to Titles wizard, holdings appear for loading like the following.
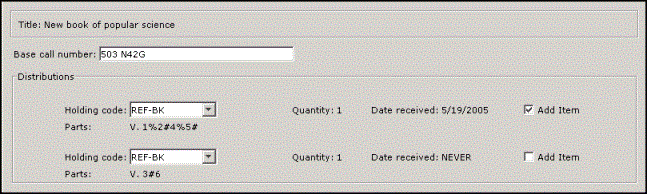
When you click Add/Update Items to load the received items, the individual volumes appear for barcoding.
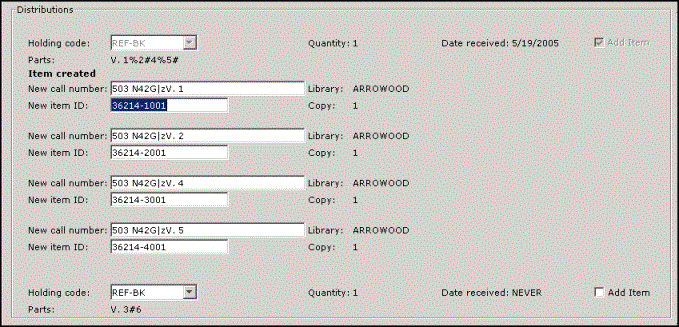
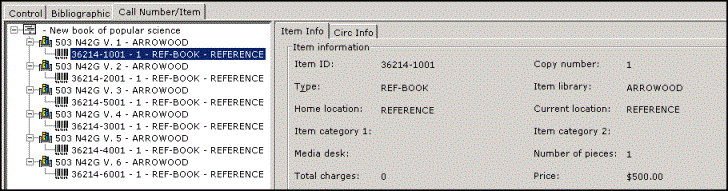
When the barcodes are updated and the title is searched, it displays volumes in the following way.
When this title was linked to the order, it was linked to a base call number of 503 N42G and there were no copies on the call number. Notice that the first call number was changed from 503 N42G to 503 N42G V.1. If the order had been linked to a call number that had an attached copy, that call number would remain in the list and V.1 would be the second call number in the list.
When the Link Order Line Holdings to Titles wizard is used after receiving volumes three and six, the call numbers appear as follows, and the order is no longer open.
Can I print item labels as I add items to the catalog?
Yes. The Print Preview Labels and Print Labels helpers are available for printing item labels as you add items to the catalog. Select these helpers on the wizard properties Helpers tab.
Also, you have the option of automatically printing item labels as they are loaded. You can select Print Labels for Items Added to the Catalog in the wizard properties. This option allows you to print labels for multiple items in one step. You can select to print the labels automatically without preview, or you can select to preview the labels before printing.

If you select the Print Labels for Items Added to the Catalog property, there is not opportunity to edit the resulting call numbers before labels print.
Changes you make in the Print Preview step will be made to the item label only, and will not be saved to the database. If you anticipate that you will need to change the call number or other information for the loaded items, consider using the Print Preview Labels and Print Labels helpers instead.
When using the auto-printing feature, the Print Preview and Print window will open each time you click Add/Update Items, and item labels will be printed for every new item on the screen. You will not have the option to pick and choose which label to print. Utilize the Print Preview Labels and Print Labels helpers after all new items have been created to print all the labels, once changes have been completed.
Related topics